Kuwii
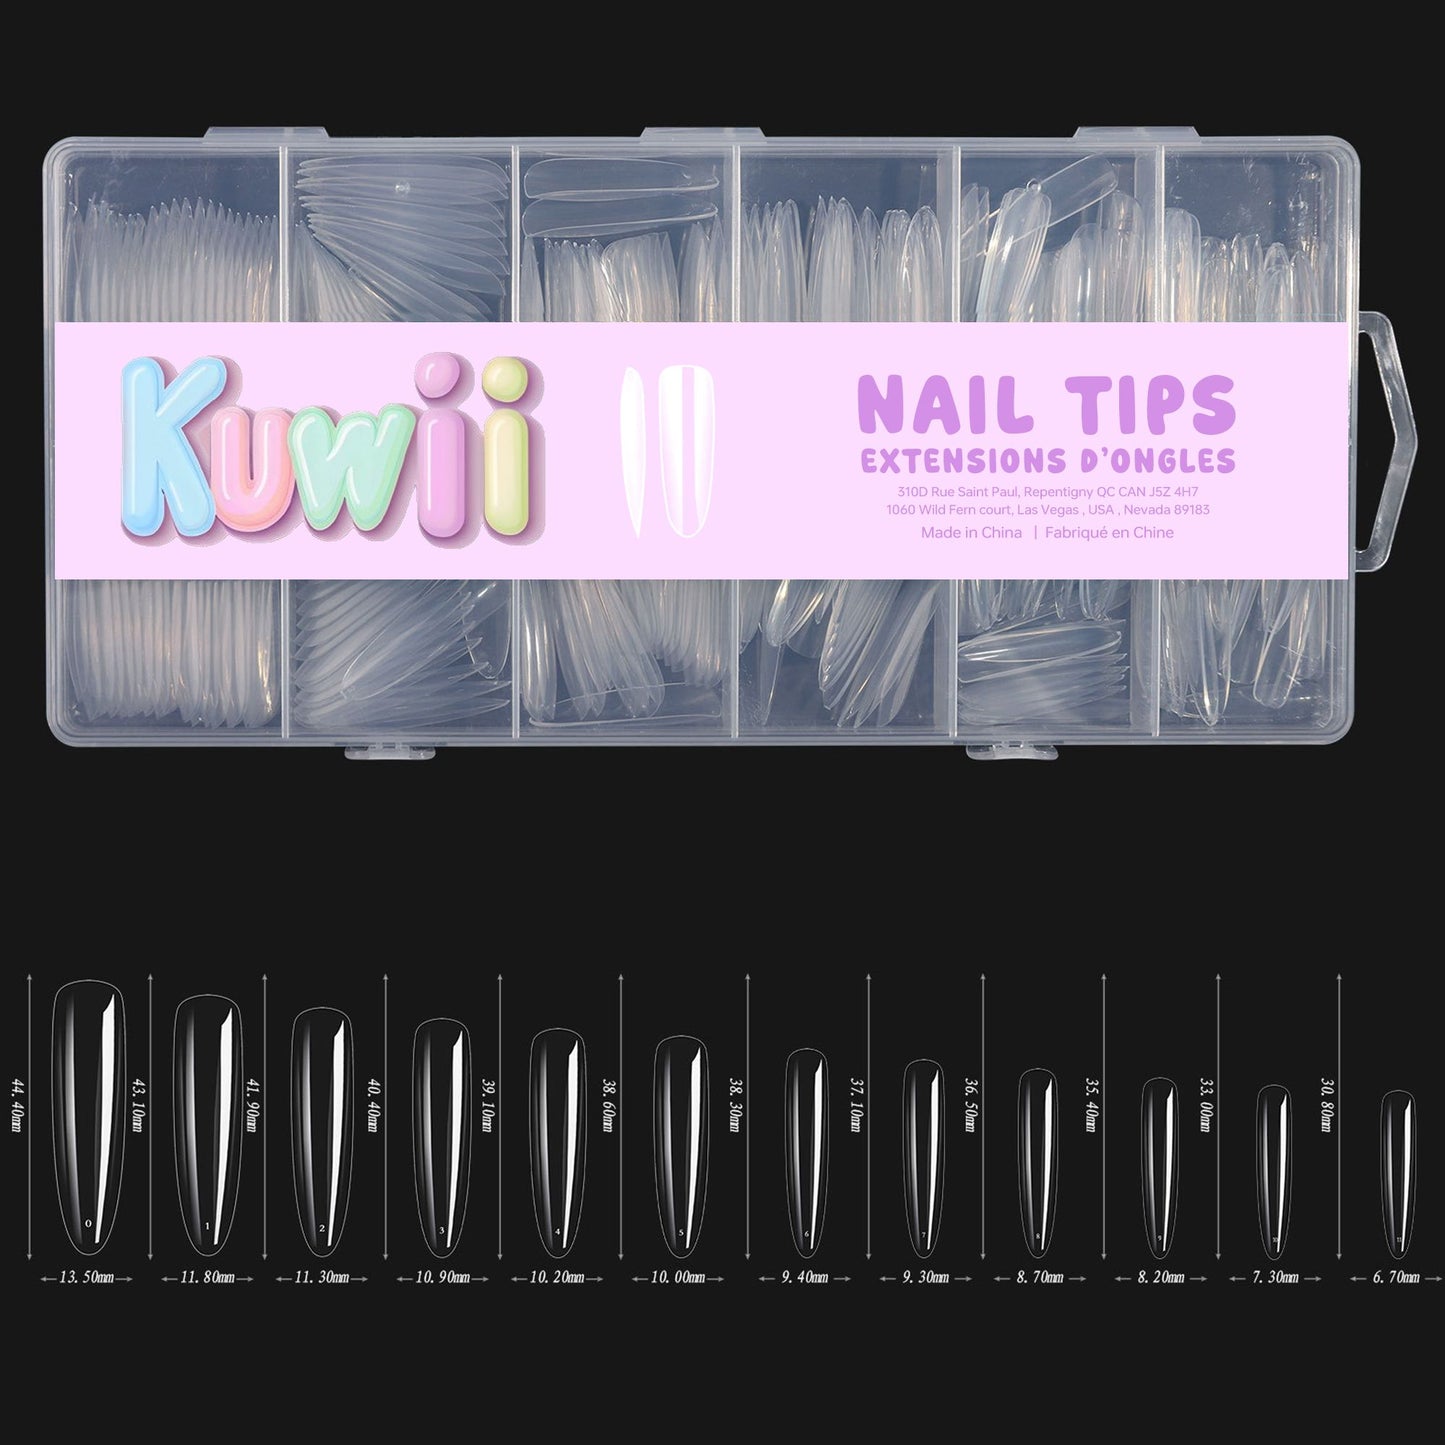
Nail Extensions - Almond Shaped, Long Size, Full Nail Cover
Nail Extensions - Almond Shaped, Long Size, Full Nail Cover
Couldn't load pickup availability
These Professional Nail Extension Tips are precision-cut, flexible forms used to instantly add length to the natural nail. Available in various shapes (like square, almond, or coffin) and sizes, they provide a reliable, sturdy foundation for any full nail enhancement, including acrylic, hard gel, and dip powder systems.
How to Use (Application Instructions):
For seamless length and a secure fit, follow these steps precisely:
Select Size: Choose a nail tip size that perfectly fits the width of the natural nail from sidewall to sidewall. Never use a tip that is too narrow, as this can cause discomfort and cracking.
Prepare Nail: Ensure the natural nail plate is completely prepped, dehydrated, and free of dust. Buff the area of the nail where the tip will adhere.
Apply Adhesive: Apply a small amount of nail glue or tip resin to the well (the contact area) of the artificial tip.
Secure Tip: Hold the tip at a 45-degree angle. Align the bottom edge of the tip well exactly over the edge of the natural nail. Slowly lower the tip onto the nail, pressing down firmly to ensure a seamless bond and to press out any trapped air bubbles.
Shape and Blend: Once the glue is set, cut the tip to the desired length. Use a file to shape the free edge and gently blend the contact area where the tip meets the natural nail to eliminate any noticeable ridge.
Continue Enhancement: Proceed immediately with the application of your chosen overlay product (e.g., acrylic, builder gel, or dip powder).
Key Benefits:
Instant Length: Provides immediate, uniform length, making it ideal for clients with shorter natural nails or for creating dramatic nail designs.
Seamless Fit: Designed with a gentle curve and defined contact points for easy blending and a natural-looking transition from the artificial tip to the natural nail.
Durable Foundation: Creates a stable and strong base capable of supporting the weight and structure of professional nail enhancement products.
Versatility: Available in multiple shapes and sizes, accommodating diverse nail beds and allowing for extensive customization of the final nail shape.
Warnings and Safety Precautions:
Please adhere to safety guidelines for proper product use:
Proper Sizing: Never force a tip to fit. Using tips that are too small will cause stress, discomfort, and premature cracking of the finished enhancement.
Air Bubbles: Avoid trapping air bubbles under the tip during application. Air bubbles significantly weaken the bond and can allow moisture to enter, potentially leading to fungal growth.
Adhesive Safety: Use nail glue/adhesive carefully. Keep the product away from skin and eyes, as it bonds instantly.
Filing: Use caution when filing the contact area to blend the tip; avoid aggressive filing on the natural nail plate, which can cause damage.
Discontinue Use: If irritation or persistent pain occurs after application, remove the product immediately and seek medical advice.
How to use and Warnings
How to use and Warnings
💅 How to Use (Step-by-Step Instructions):
For best results, follow the Gel Polish sequence precisely:
Step 1: Prep & Prime
Use the Cuticle Pusher to gently push back the cuticles. Shape the natural nail with the Nail File and lightly buff the surface to remove shine. Cleanse the nail (alcohol wipe recommended). Apply a thin coat of Primer and let it air-dry completely.
Step 2: Base Coat
Apply a very thin, even coat of the Base Coat (like the Bottom Coat). This layer adheres the polish to the natural nail. Cure this coat under a UV/LED lamp for 60 seconds. Do not wipe the tacky layer.
Step 3: Color Application
Apply a thin, even coat of your chosen Gel Polish Color. Avoid getting polish on the skin or cuticles. Cure this coat under a UV/LED lamp for 60 seconds. Apply a second thin coat of Color for opacity, and cure again for 60 seconds.
Step 4: Top Coat & Finish
Apply a thin, even coat of the Top Coat (like the Top Coat). Ensure the free edge (tip) of the nail is sealed. Cure this final coat under a UV/LED lamp for 60-120 seconds (follow your lamp's instructions). If your Top Coat leaves a sticky residue (a "tacky layer"), wipe it gently with an alcohol pad to reveal the high-gloss shine.
✨ Key Benefits:
- Salon-Quality Shine: Achieves a highly pigmented, glass-like finish that is chip-resistant and lasts up to three weeks.
- LED/UV Cured Durability: The light-curing process ensures a quick, hard, and durable set that provides long-lasting wear.
- Full System Inclusion: Includes the essential Base Coat, Top Coat, and Color Gels, along with necessary tools like the Cuticle Pusher and Nail File for immediate application.
- Ready-to-Go Kit: Perfect for beginners and enthusiasts, offering a complete professional system in one convenient box.
⚠️ Warnings and Safety Precautions:
Please adhere to safety guidelines for proper product use:
- Avoid Skin Contact: Gel polish may cause irritation if it cures on the skin. Avoid all contact with the skin. If contact occurs, wipe it away immediately before curing.
- Proper Curing: Ensure your UV/LED lamp is working correctly and that you cure each layer for the recommended time to prevent under-curing, which can lead to irritation.
- Storage: Keep all gel polish bottles tightly capped and stored away from direct light (especially sunlight or the UV/LED lamp), as the product will prematurely cure and harden.
- Discontinue Use: If irritation, redness, or burning occurs, remove the product immediately and seek medical advice.
- Removal: Do not peel or forcefully remove gel polish. Use the proper soak-off method (usually with acetone) to prevent damage to your natural nails.
Share